Sweet Potato and Quinoa Salad

Yes this recipe is tasty even though it is a vegetarian recipe.  Most people assume that if it’s all natural, organic and vegetarian that it probably doesn’t taste that good.  Well, this will have you questioning that belief.  The mixture of sweetness from the cinnamon flavored sweet potatoes and raisins verses the tangyness from the mustard flavored dressing and onion will send your taste buds into a frenzy.  Now I can’t say that its vegan mainly because there is honey in the dressing, but boy is it close.  I hope you enjoy these flavors as much as I do.


DSC_0573

Serving Size: 4 to 6

Ingredients:

Salad

  • 2 Large Sweet Potatoes peeled and cubed
  • 3 tbsp Olive Oil
  • 1 tsp Salt
  • 1/2 tsp Black Pepper
  • 2 tsp Ground Cinnamon
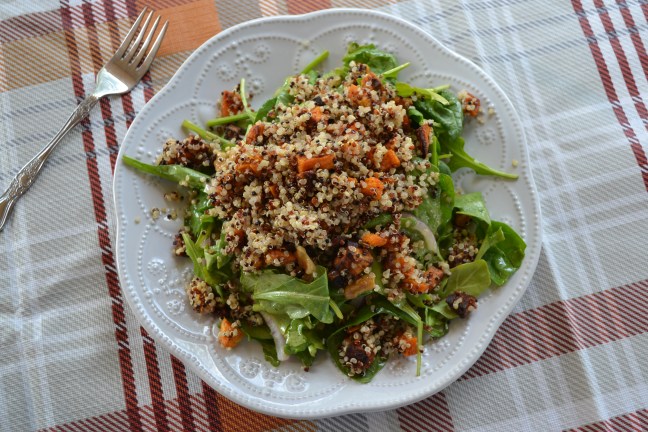
  • 2 to 3 cups cooked Quinoa
  • 6 cups Spinach and Arugula salad mix
  • 1 Red Onion thinly sliced
  • 1 cup of Walnuts or Pecans
  • 1 cup of Raisins or Craisins

Salad Dressing

  • 2 to 3 tbsp Olive Oil
  • 1 tbsp Balsamic Vinegar
  • 3 to 4 tbsp Dijon Mustard
  • 1/2 tsp Salt
  • 1/4 tsp Black pepper
  • 1/4 cup Honey
  • 1 to 2 tbsp Lemon Juice
  • 1 clove Garlic finely chopped or 1/4 tsp Garlic Powder

DSC_0550

Directions:

  1. Preheat oven to 400 degrees and line a baking sheet with parchment paper.
  2. Wash and peel/skin sweet potatoes.  Cut them into small cubes and place in medium size bowl.  Add the olive oil and salt and pepper.  Make sure sweet potato cubes are coated well with olive oil, salt and pepper before spreading onto the baking sheet.

    DSC_0558

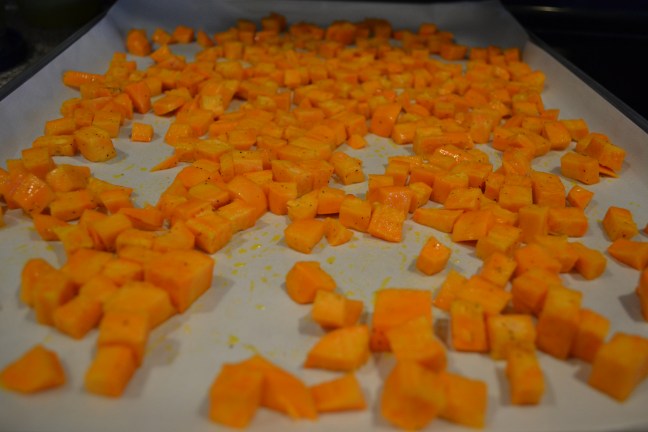
  3. Bake sweet potatoes for 45 to 50 minutes in the oven.
  4. While sweet potatoes bake, whisk together Salad Dressing Ingredients to your liking.  Cover and set it in the refrigerator until ready to serve.  DSC_0561
  5. Boil the quinoa in a medium sauce pan with 4 quarts water for 10 minuntes.
  6. Drain the water from the quinoa and let it cool in a medium bowl.  DSC_0564
  7. Wash and dry spinach and arugula and place in large bowl.
  8. Peel a red onion and thinly slice before adding it to the leafy greens.  DSC_0562
  9. Sprinkle in preferred nuts and raisins.  DSC_0563
  10. Remove the sweet potatoes from the oven and sprinkle them with cinnamon.  Let them cool before mixing them with the cooked quinoa.
  11. Add a small amount of the dressing to the sweet potato and quinoa mix and stir until well blended.
  12. Add the remainder of the dressing to the salad portion and mix well.  Serve  in bowls and top with sweet potato and quinoa mix.

Enjoy a sweet and tangy vegetarian mix while indulging in great conversations with loved ones. Tasty and healthy, such a win, win!


Thanks for the inspiration SkinnyMs blog.  You came up with a great recipe that I tweaked just a bit :).  It’s one for the recipe book.  And it’s such a great one to save for the fall season!

Katie

PeachPearPlum

Potato and Lentil Soup

I’ve been working on my future cafe menu, and I am doing my best to meet the needs of a wide range of people and their ‘diets.’  Many of my past students with special needs had and still have food allergies or sensitives to certain foods.  Reactions range from rashes to behavior challenges, so it’s important to me to make sure to have homemade options on the menu that are dairy free, no meat, etc. I have purchased multiple vegan baking books, recipe magazines, etc.  I tend to utilize many of these outlets but some how still tweak recipes to make them more my cup of tea.

This soup is purely vegetarian.  It’s made with fresh veggies and herbs and spices.  Don’t worry, I’ve included a few short cuts to help you during the process.

IMG-6040

Ingredients: (serves 8 to 10)

  • 1/2 cup chopped celery
  • 1/2 cup sliced carrots
  • 1 small bag of Yukon gold potatoes chopped
  • 1 bag of lentils
  • 1 tbsp olive oil
  • 3 cloves of diced garlic
  • 6 oz can of tomato paste
  • 8 oz of chopped kale
  • 1/2 cup diced yellow onion
  • 8 cups veggie broth
  • 2 tsp paprika
  • 1 tsp salt
  • 1/2 tsp pepper
  • 2 1/2 tsp ground cumin
  • 1 tsp coriander

Directions:

  1. Using a Crock-pot or large stove pot pour in the olive oil, garlic and diced yellow onion.  Let it heat up and cook for a little while until barely sauteed.
  2. Pour in the broth and tomato paste. Stir until well blended.
  3. Add in the celery, carrots, potatoes and lentils (make sure all veggies are washed and cleaned before adding to the soup).
  4. Sprinkle in the salt and pepper, paprika, coriander and ground cumin (to taste) and stir (let it come to a boil if using the stove top).  IMG-6032
  5. Add in the chopped kale and then cover.
  6. If you are using a crock-pot, cook on high for 6 to 8 hours.  If you are using the stove top, cook at medium high heat (low boil) for 3 to 5 hours (may need to go down to medium low heat once boiling).
  7. Make sure to stir occasionally and taste.  You may want to add more seasoning depending on your taste buds.

IMG-6039

Hope you enjoy this soup as much as I do.  It’s pleasing to the nose and the body.  Hoping to bring you more enjoyable dishes that benefit your health and is simple to make.


– Katie

Chocolate Pound Cake with Orange Glaze

With just a few tweaks I made my grandmothers chocolate pound cake with a bit of a Florida twist.  Florida oranges with a delicious chocolate cake, so good.  You just can’t go wrong with a chocolate cake and orange glaze.  It’s sweet yet tangy all in one bite.  Another refreshing recipe just for you.   I’m so grateful for a grandmother who shares her recipes, and this is one for the books.  The recipe book that is.

Ingredients

Pound Cake:   

3 sticks of unsalted butter (room temp)

3 cups sugar     

5 eggs                   

3 cups of all purpose flour

1/2 tsp baking powder   

1/2 tsp salt   

4 tbsp. cocoa powder      

1 cup of gran. sugar

1 tsp vanilla extract

Orange Glaze:

1 tbsp. fresh orange juice

1 tsp. orange extract

1 – 2 cups of confectioners sugar

Candied Orange Peel

1 Orange

1 cup of water

1 cup whole milk


Chocolate Pound Cake with Orange Glaze

Instructions

1. Cream the butter and sugar in a large mixing bowl.

DSC_0131

2. Add in eggs one at a time and beat well after each egg.

DSC_0127

3. Sift the rest of the dry ingredients into a large bowl.

DSC_0135

4. Scoop and dump in sifted dry ingredients (a cup at a time) and pour in milk (1/4 cup at a time) by alternating them.  Blend well after each addition.

5. Add vanilla extract and beat well.

6. Grease tube pan or bundt pan with butter (or shortening) and if you’d like, dust it with cocoa powder (or flour).

7. Preheat oven to 350 degrees.

8. Add in the blended ingredients using a spatula and bake for 70 to 75 minutes.

9. While the cake is baking, peel the skin off of an orange.  Slice the peel into thin strips.

10. Heat 1 cup of water in a pot on the stove.  Add in sliced orange peel and simmer for about 15 minutes.

11. Add in a little more than 3/4 cup of sugar and stir.  Continue to let simmer on medium low heat until the sugar dissolves. Stir occasionally so that it stays a simple syrup instead of caramel.

12. Drain the orange peels using a metal strainer and spread the peels out onto parchment paper on a pan.

IMG_3216

13. Sprinkle the orange peels with the remainder of the sugar.

IMG_3218

14. When the cake is finished baking, let it stand and cool before removing it from the pan.

15. Preheat oven to 200 degrees F.  Place orange peels in the oven for one hour.  The candied orange slices should be hard and dry when finished baking (set them aside for later).

16. Whip together the orange extract, orange juice and confectioners sugar until you get a nice smooth glaze that is easy to pour but thick enough to not run off the cake.

17. Cut off the end/bottom of the pound cake so that it sits perfectly on the cake stand or large dish and let it finish cooling.  Then carefully drizzle the glaze over the top of the cake.

18. Sprinkle candied orange peel over the top of the cake.

19. Slice, serve and enjoy!


Hope you enjoy a Florida twist on an Alabama favorite family recipe.  What is your all time favorite recipe from grandma?

Katie

Thanks for sharing your delicious chocolate pound cake recipe Bigmama!  I love that family recipes can be passed down from generation to generation.

Chocolate Pound Cake with Orange Glaze

Chocolate Pound Cake with Orange Glaze

Chocolate Pound Cake with Orange Glaze

Pumpkin Pie Scones

This scone recipe is based off of one of my all time favorite pumpkin pie recipes.  A pie recipe that does not require a crust.  It’s a simple yet delicious recipe.  The pumpkin flavor isn’t over powering and the tasty topping is a sweet treat with each bite.  Smelling them bake in the oven is just such a glorious aroma.  My mouth waits in anticipation each time I bake them.  To help distract you from watching the timer like I do, prep a cup of coffee or tea to enjoy with the scones.  They pair so well together.  Hope you enjoy.

I’d like to thank Betty Crocker Cookbook from the 1990’s for the delicious pie recipe.  It has been so much fun to modify and play around with this new pumpkin scone recipe.

Dry Ingredients

  • 2 cups flour (sifted)
  • 1 tbsp baking powder
  • ⅓ cup brown sugar
  • ¼ cup sugar
  • 1 tsp cinnamon
  • 1 tsp nutmeg
  • 1 tsp orange peel
  • 2 tsp pumpkin pie spice
  • ⅛ tsp salt

1 stick of frozen butter grated

Wet Ingredients

  • 1 tbsp vanilla extract
  • 1 egg
  • ½ cup pumpkin puree
  • 1 tbsp honey
  • ¼ cup heavy cream

Brown Sugar Topping

  • ¼ cup brown sugar
  • ¼ cup quick-cooking oats
  • 1 tbsp softened/melted butter


Instructions

  1. Preheat oven to 400 degrees
  2. Line a baking sheet with parchment paper.
  3. In a large bowl, sift the flour, brown sugar, baking powder, sugar, cinnamon, nutmeg, orange peel, pumpkin spice and salt.   
  4. Using a cheese grater (large holes) grate one stick of frozen butter and blend it into  the mixture until it resembles coarse crumbs. 
  5. In a small bowl, whisk together the egg, heavy cream, vanilla extract, honey and pumpkin puree.  
  6. Pour the wet ingredients over the dry ingredients and mix until just combined.
  7. Pat the dough out into a rectangular shape (like a flat log) that is about 1 inch thick.  Cut into 6 – 8 equal wedges (you can use a pizza cutter).  
  8. Arrange the wedges on your baking sheet or scone pan.    
  9. To make the topping, melt the butter carefully in a pan on the stove.  Add in the brown sugar and oats and mix well.
  10. With your fingers, press in a decent amount of the topping onto each scone.
  11. Bake for 14 to 16 minutes depending on your oven (I rotate mine after 10 to 12 minutes).
  12. Remove from the oven and allow to cool before enjoying.

What a delicious remake of an old pumpkin pie recipe into a decadent scone. Autumn is such a wonderful season.  It’s hard not to think of autumn without pumpkin.  One of my favorite pumpkin pie recipes is crust-less.  That’s right, no crust.  Instead, you cover the pie with a brown sugar topping that holds it all together, while adding a bit more sweetness.  That’s what makes these pumpkin pie scones taste even better and adds some crunch. Don’t take my word for it, try it for yourself and enjoy.


Katie


Raspberry Scones with Lemon Glaze

This scone recipe is a bit more work than the rest of my scone recipes, but it’s so worth it!  It is a refreshing treat in this Florida heat.  The lemon glaze compliments the raspberry scone so well.  It’s that sweet yet sour flavor that is just a breath of fresh air.  So if you are looking for something to heighten the taste buds, this is it!

IMG_2705

Ingredients:

Scones

2 cups flour

⅓ cup packed brown sugar

1 tbsp baking powder

¼ tsp salt

1 stick of butter (frozen and grated)

1 egg

¼ sour cream

⅓ cup raspberry curd

½ cup fresh raspberries


Raspberry Curd   (Do this FIRST)

6 oz raspberries

3 egg yolks

¾ cup powdered sugar

1 tbsp lemon juice

1 tsp lemon zest

8 tbsp butter (room temp and cut into chunks)


Lemon Glaze

1 tsp Lemon extract

1 tsp Lemon Juice

1 to 2 cups Confectioners sugar


Instructions:

  1. Preheat oven to 400 degrees.
  2. Line a baking sheet with parchment paper.
  3. Prep table area with a sprinkle of flour and cutting blade.
  4. Puree raspberries in a food processor.
  5. Zest 3 to 4 lemons.  


  6. Using a double broiler (you can use a small pot with a glass bowl like I did). Add water to the pot and put on low heat.  
  7. Combine egg yolks, lemon juice, lemon zest and pureed raspberries into the glass bowl.  Make sure to cook over low heat and whisk for 8 minutes before adding the powdered sugar and continue to whisk for a few more minutes, until thickened.  IMG_1046
  8. Remove from heat and whisk in the butter.
  9. Strain the curd filling by pushing it through the strainer into a glass bowl.  This way you have less seeds in the curd.Raspberry Curd Filling
  10. Press plastic wrap directly onto the surface of the curd so there won’t be a skin later.  Then refrigerate until it is chilled.  Raspberry Curd Filling
  11. In a large bowl, sift the flour, brown sugar, baking powder, and salt.  
  12. Using a cheese grater (large holes) grate one stick of frozen butter and blend until the mixture resembles coarse crumbs.  
  13. In a small bowl, whisk together the egg, sour cream, and raspberry curd.  
  14. Pour the wet ingredients over the dry ingredients and mix until just combined.
  15. Sprinkle in the fresh raspberries.
  16. Carefully spread the raspberries throughout the ingredients. Don’t over blend it but make sure you don’t have large sections of it.
  17. Pat the dough out into a rectangular shape (like a flat log) that is about 1 inch thick.  Cut into 6 – 8 equal wedges (you can use a pizza cutter).
  18. Arrange the wedges on your baking sheet or scone pan.   
  19. Bake scones for 14 minutes and then rotate pan and bake an additional 2 to 3 mins until golden brown.
  20. While scones are baking, whip together lemon extract, lemon juice and confectioners sugar until thick but easily pour-able.
  21. Remove from the oven and allow to cool before pouring the lemon glaze over each scone.

The raspberry curd can be made ahead of time and placed in the refrigerator to make it a bit easier. Thank you for your interest in my recipe and I hope you enjoy!

Katie