Winthrop Art Festival

If you have lived in the Brandon/Riverview Florida area for the past few years, you’ve probably heard about this local art festival.  I have had the privilege to participate in this event multiple times.  Winthrop Town Centre is a wonderful location full of people who enjoy community, art and some great food.  If you have a chance to stop by, do so.  There are some really talented people in our area.  You would be so amazed by some of the artwork and crafts that are for sale.

Not only is artwork and food on sale at this festival but you get free entertainment too!  Local musical artists, Winthrop Charter School students music, entertainers and performers of all walks of life.  Seriously, this a great weekend get away that is so close to home.  Support your local small businesses and artists and connect to the community.

winthrop entertainment
Photo by Winthrop Photographer

For about four years my class participated in this event and the students loved creating works of art and crafts!  Even more, they loved working the booth and seeing people enjoying their work.  Here are a few pictures of some of the unique work my students have done.  Trust me there are a lot of booths with many different items and interests that you’ll be sure to find something you admire.

There are many opportunities for children to enjoy this event as well.  So bring the kids and encourage them to enjoy the arts. The Art Factory will be open to help kids get inspired and create something to take home to remind them of the artist in them.

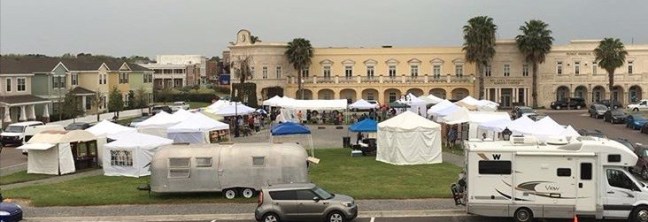
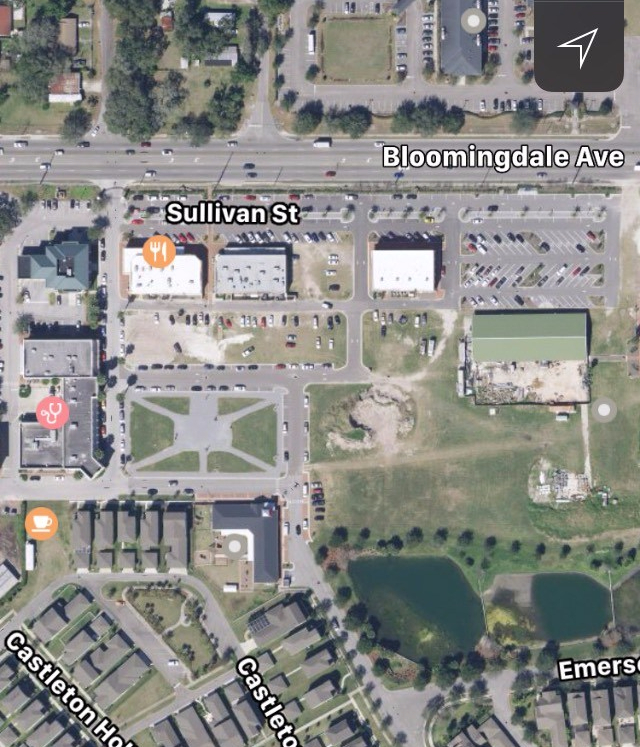
Art lovers of all sorts are selling their priceless works of art as well as crafts on March 25th and 26th (2017).  The Art Festival is located in Winthrop Town Centre area off of Bloomingdale and Providence.  There is a large field area behind Boca’s Restaurant that will be filled with tents ready for customers. Hope to see you there!

IMG_0068
Google earth – Winthrop Town Centre

Visit their website for more information and multiple ways to get involved in and support our community.

http://www.winthroparts.org/2017-arts-festival-and-artisan-market/

Their facebook page is: https://www.facebook.com/WinthropArtsInc/


winthrop arts
Winthrop Logo

Job Skill #1 – Wrapping Utensils

There are many jobs that a person with a disability is capable of doing, but I figured lets start simple.  We can work our way up. Here is the process or steps I used when doing one of the job stations as an ESE teacher when focused on employability skills.  There will be a printable document at the end you may use.

Start by laying everything out.  This includes an empty container, utensils, napkins and the instructional steps.  I like this layout best because when the student would finish and I checked their work, they would then unroll the napkins and sort the utensils back in the organizer. As well as fold the napkins neatly or have them sort the napkins into the dirty clothes pile (whites, darks, delicates).  These are just a few ways to encourage more independent skills.  Now back to napkin rolling:

DSC_1244
An empty tray or container to place rolled napkins, utensils available, laid out cloth napkins.
DSC_1258 (1)
I always make sure to have a picture of the way I want it so the student knows exactly what is expected

Make sure to have a variety of napkins so they are capable of dealing with differences in a comfortable setting.

Step 1: Lay out a cloth napkin on the table

DSC_1246

Step 2. Fold the cloth napkin into a triangle (so in half)

DSC_1247

Step 3: Place a fork, knife and spoon in the bottom, center area of the triangle

DSC_1248

Step 4: Fold the right corner of the triangle over the utensils

DSC_1252

Step 5: Fold the left side of the triangle over the utensils so it looks like an open envelope

dsc_1253.jpg

Step 6: Begin to roll the covered utensils toward the tip of the triangle

DSC_1254

Step 7: Continue to roll until all the way to the tip top

DSC_1255

Step 8: Place completed rolled napkin onto the tray or container.

It may be a simple job but it makes the table setting look nice and it teaches students/employees the importance of good hygiene (touching utensils used by others) and to do your best because presentation is important. Some other skills it can hit include; matching, sorting, washing, drying, storage and probably a few others.

I have included a step by step printable document.  Please feel free to use it and modify it as need, but please give credit where credit is do.   Napkin rolling job skill

Thank you,

Katie

Here are a few links through amazon for cloth napkins (I do receive compensation for clicking and purchasing the items below):

Cotton Craft Dinner Napkins – Multicolor 12 Pack – Pure 100% Cotton – 20×20 Oversized – Set contains one each Magenta, Lime, Ming Red, Stone, Black, Lavender, Grape, Orange, Teal, Navy, Mustard & Leaf“>assorted colors

LinenTablecloth 17-Inch Polyester Napkins (1-Dozen) White“>White linen napkins

Wild Tea and Vibrant Tea Defuser

A sweet tasting tea in a ‘HOT’ container.

Amazon has been a useful tool lately and a great way to send gifts across the country.  I had never heard of The Wild Crew before.  It wasn’t until recently that I was gifted this tea along with this cool drink container.

DSC_1230 (1)

DSC_1232 (1)

The tea is sweet and has a red vibrant color.  There was no need for honey, sugar or cream.  It tasted so great all on its own. You only need a small portion to make such a great flavored tea.  The Wild Crew has a decent selection of teas – all are loose leaf.

Here is where this ‘mug’ comes in handy.  It has a defuser that can be removed if you want to have a different drink (coffee, water, etc).  But if you prefer a good tea… you add a small portion of loose leaf tea, close the lid to the defuser and insert it into the ‘mug’.

I proceeded to heated up some water and poured it over the defuser. I let it slowly steep the tea.  It only took moments to begin smelling the delicious aroma. I made sure to close the ‘mug’ shake and let sit for about 10 minutes.  This container will stay hot for hours so be careful when taking your first sips.

DSC_1259

The main reason I have come to enjoy this tea is the fact that I am doing my best to learn how to make my own tea.  When you open the Wild Tea, you see so many different dried fruits, herbs and tea leaves that it makes me think I can make my very own.  I have been learning about loose leaf teas, dehydrators, and much more.  I would love to be able to make another area for jobs to become available when I open my tearoom.  How neat would it be to see  hard working people (mainly those with disabilities) take on a job making delicious loose leaf tea and have the opportunity to see people enjoy it?  I know I would be a proud owner.

If you have any suggestions for delicious loose leaf tea that might be easy to put into steps please feel free to share.

Thanks,

Katie

I do not receive compensation for this post. However I do receive compensation if you link on either item through amazon:

Organic Berry Loose Leaf Tea, Wild Tea 6, Herbal Tea With Hibiscus, Elderberry, Currant and Cranberry (4 ounce)“>Wild Tea #6 or VIBRANT ALL IN ONE Travel Mug – TEA INFUSER Bottle WITH 2 PIECE STEEPER STRAINER COMBO – Insulated HOT COFFEE THERMOS – Cold FRUIT INFUSED Water – LEAK PROOF Tumbler Double wall Stainless Steel 17oz“>Vibrant All in One Mug 

If you are interested in other products as well as The Wild Crew tea visit: http://www.wildfoods.co

and follow them on instagram: @WildFoodsCo

Sugar Plum Scones

Another tasty treat from the tearoom to your home. Enjoy the smell of the sweet brown sugar, oats and plum fruit as it bakes so nicely in the oven.  No nuts are involved in the making of this recipe just a delicious, crispy  scone topped with yumminess.  I hope you enjoy this sugary sweet scone as much as I do.

DSC_1150

Scones:

Dry Ingredients:

1 and 1/2 cups of Flour

1/3 cup Brown Sugar

1/2 cup of Oats

1 tbsp of Baking Powder

1/2 tsp of Salt

1/2 tsp of cinnamon

1 stick of frozen shredded butter

Wet Ingredients:

1 egg

1/4 cup heavy cream

2 tsp of vanilla extract

1/4 cup greek yogurt

1/2 cup diced plums

1 tbsp of plum jam

Toppings:

Glaze topping

1/2 cup powdered sugar

2 tbsp clear vanilla extract

1 – 3 tbsp of heavy cream

Sprinkle topping – optional

2 tbsp flour

1/4 cup brown sugar

2 tbsp butter (melted)

2 tbsp oats

IMG_9935

Instructions:

1.Preheat oven to 400 degrees

2Line a baking sheet with parchment paper or spray tray with nonstick cooking spray.

img_9269

3. In a large bowl, sift the flour, brown sugar, baking powder, cinnamon, and salt. Then add in the oats.

img_9273

4. Using a cheese grater (large holes) grate one stick of butter and blend until the mixture resembles coarse crumbs. I strongly recommend using a cheese grater to cut the frozen butter.  It is so much easier. Here is the one I used.  I do get compensation if you click on this link and order. Cuisinart CTG-00-BG Boxed Grater

5. In a small bowl, whisk together the egg, heavy cream, yogurt, plum jam and vanilla extract.

IMG_9898

6. Pour the wet ingredients over the dry ingredients and mix until just combined. 

7. Gently add in the diced plum.

8. Pat the dough out into a circular shape that is about 1 inch thick.  Cut into 6 – 8 equal wedges (use a pizza cutter).

9. Arrange the wedges on your baking sheet or scone pan.  Using a basting brush, brush some heavy whipping cream over the tops of the scones.

IMG_9923

10. Bake scones for 12 – 14 minutes or until light golden brown.

11. Remove from the oven and allow to cool while you mix the glaze.

12. To make the glaze, add the powdered sugar and vanilla into a small bowl.

13. Add the heavy whipping cream slowly (one tbsp at a time) until the mixture is easily pour-able but not runny.  Drizzle the glaze over the scones.

13.  To make the sprinkled topping, melt the butter in a small pan.  Add in brown sugar, flour and oats until well blended and crumble like.  Sprinkle brown sugar topping over the glazed scones and enjoy!

IMG_9929


Sugar Plum Scones by PeachPearPlum

Peach Semifreddo

I’m a pretty big fan of Giada on Food Network.  She makes this incredible Pineapple Semifreddo that literally melts in your mouth.  Every time I make it for friends and family it is devoured quickly.  So, why not modify the recipe a smidgen, and make it with peaches instead?  My thoughts exactly. By the way this is a huge dessert success for the kiddos too and pretty simple to make.


Ingredients:

  • 1 cup heavy cream
  • 2 tablespoons powdered sugar
  • 1/2 teaspoon vanilla extract
  • 3 egg whites
  • 1/2 cup simple syrup, recipe follows
  • 1 (15-ounce) can diced peaches, drained, and mashed
  • 1 cup crushed gingersnap cookies, for sprinkling


Simple Syrup:

  • 1/4 cup water
  • 1/2 cup sugar


1. Spray a 9 1/4 by 5 1/4 by 3-inch (6-cup) metal bread ban lightly with nonstick spray. Line the pan with plastic wrap with enough plastic wrap extending over the sides to cover the top after the pan has been filled.

2. In a medium bowl, whip the heavy cream, powdered sugar, and vanilla extract until stiff peaks form. Set aside until step 5.

3. In another medium bowl, whip egg whites until foamy. With the mixer still on, slowly add the simple syrup. Continue beating on high speed until the mixture is glossy and doubles in volume, about 3 to 5 minutes.

img_9760

img_9762

4. Since crushed peaches in a can is not something you find anywhere you need to mash a 15oz can of diced peaches.  Place diced peaches into a strainer and smash the peaches with a masher.

img_9763.jpg


5. Using a rubber spatula, fold the peaches into the egg whites. Then fold the whipped cream into the egg white mixture.

img_9811

6. Gently pour the mixture into the bread pan. Fold over the plastic wrap (cling wrap) to cover and freeze for 8 hours (or up to 1 month).

7. To serve; unfold the plastic wrap and invert the semifreddo onto a cutting board. Remove the plastic wrap and cut the semifreddo into one inch thick slices. Place on individual serving plates and top each slice with the crushed ginger cookies.


Simple Syrup:

In a small pot, combine water and sugar over medium heat. Bring to a boil, reduce heat and let simmer for 5 minutes, until the sugar has dissolved fully. Take the pan off heat and cool the syrup (makes 1/2 cup). Any extra cooled syrup can be saved in an airtight container.

img_9761


And here is the final tasty product:

dsc_1121


Visit: FoodNetwork to get Giada’s Pineapple Semifreddo recipe (the only differences are; instead of crushed pineapple I replaced it with mashed peaches and I used ginger snap cookies instead of amaretti cookies).