Tea Cup Hanging Rack Re-purposed

Occasionally things break, don’t let that be the end all and trash the item.  Use your creative ideas and figure a way to reuse the broken item.  For example, I was using this mirror as a chalk board for messages for parties and art festivals.  Unfortunately it was dropped; the mirror shattered to pieces and the wood chipped on the edges.  I thought about just tossing it and moving on, but then an idea came to me.

img_9560

Last mothers day my husband installed a bar rack in our room and hung bathroom curtain hooks from it.  I was able to hang my long necklaces from it and it was amazingly convent and appeasing to the eyes (yes that’s one of my adorable daughters posing for the camera).

fullsizerender-5

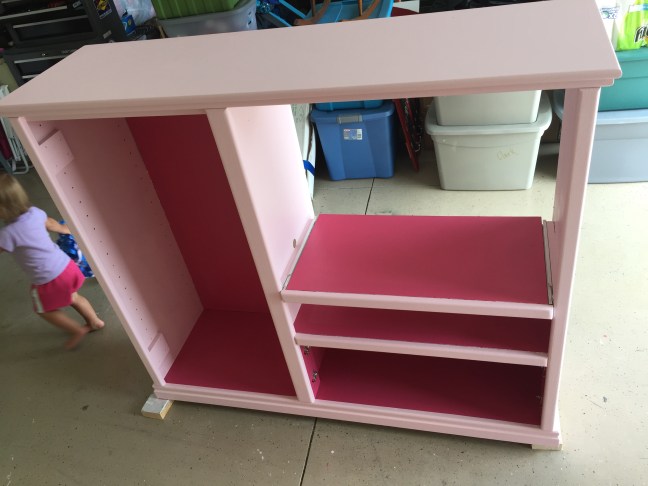
His crafty work got my mind thinking, I could use the top part of the mirror board and turn it into a hanging rack for tea cups!  It took a while and a lot of searching on Pinterest to finally get the right plan/idea in mind, so without further delay I give you my tea cup hanging rack (pear and plum colors):

Hope the following steps help you to try your hand at re-purposing broken items.  Use those creative juices and feel free to use any tips and tricks stated below.

1. My husband did a great job cutting this piece to a great size.

2. I sanded down the rough edges.

3. I then painted the piece using primer. Make sure to do at least two coats.

img_9220

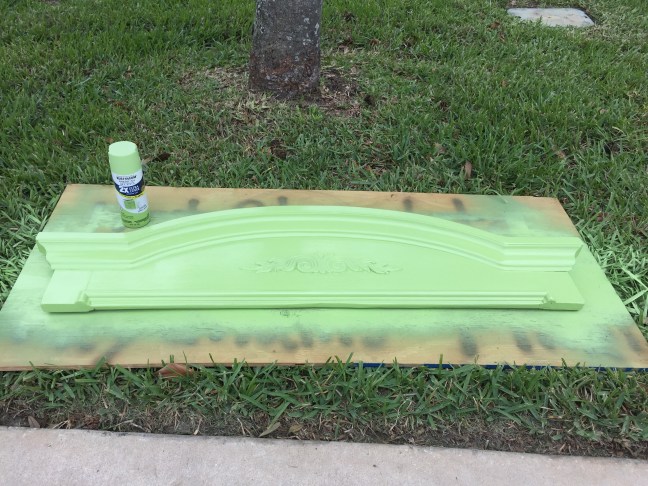
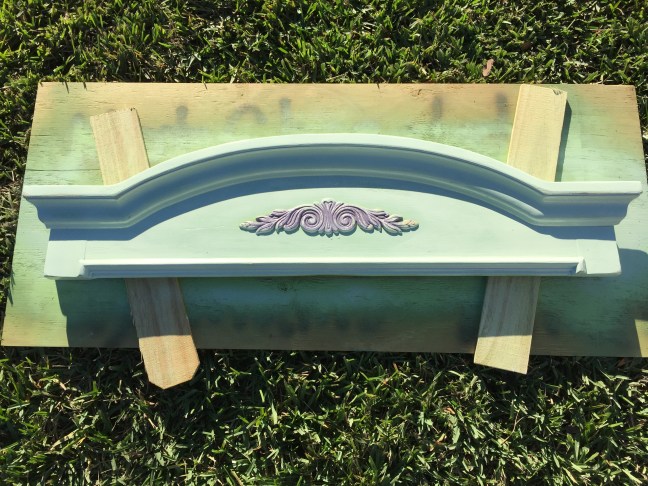
4. Make sure to lay your piece flat so that the paint doesn’t run.

5. Now for the first of many colored layers, I started with a lite green.  Spray paint goes on smoother and doesn’t leave you with lines like a paint brush with leave. I did two spray painted coats.

img_9247

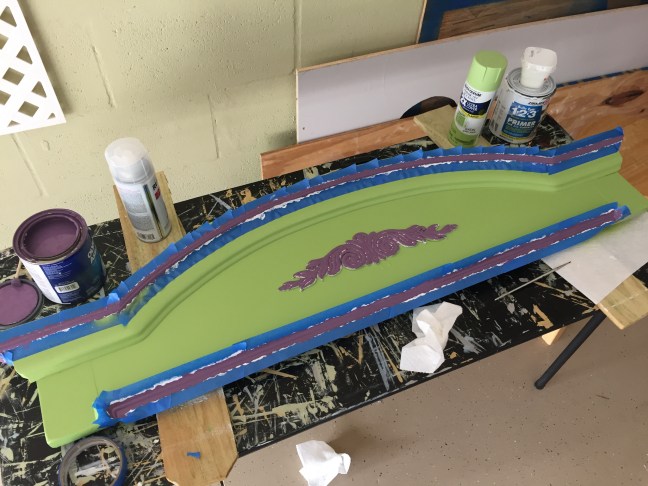
6. I then porceded to tape off the sections that would be painted another color.

7. I highly recommend using a clear paint sealer once you’ve taped all areas needed.  This way the paint won’t bleed under the tape and spread (as you’ll notice in some example pics below – step 9).


8. I used white primer paint first, then a plum purple I wanted see at the end of the project. Remember to check your garage/house for any leftover paint before purchasing new paint.  It will save you a good bit of money.

img_9253

9. Peel the tape off before the paint completely drys. And notice what happens if you don’t do the clear sealer before painting – pic on right.

10. Now it’s time for another layer – an extremely lite green color (closer to the pear color I like).  Yes I sprayed over my hard work, and a little around the craftsmanship in the middle.  This makes for a great layered effect later on – you’ll see.

img_9502

11. I spray painted the hanging rod white first and then the lite pear green color.  I sprayed it the same color as the main piece. I wanted it to blend in.

img_9631

12. Using a foam brush and a darker pear green color, I painted particular areas that helps my piece stand out.

13. I carefully taped off lined areas and painted. First the clear sealer, then white primer, and last but not least the gorgeous plum purple color again. Once again I used a sponge brush.


14. It’s time to sand!  Have fun with it.  It doesn’t have to be perfect.  As you can see, there is a great layering effect with the paint colors coming through – even got a little wood showing 🙂

img_9654

15. I made sure to seal my paint work with a spray on sealer. This includes the rod.

img_9655

16. While the sealer dried, I painted some shower curtain hooks plum purple to match the tea cup rack piece.  I found these particular hooks at target. I love that they are flowers.

17. My loving husband helped screw in the rod as well as measure out and put in place the hanging wire.

18. Once it was completed, I quickly hung it and began hanging my collection of tea cups.

Thanks for reading!  I look forward to hearing how you re-purposed a broken piece and gave it new life.

Katie

Hydrangea Watercolor Video

Hope you enjoy watching my sped up version of a hydrangea watercolor painting.  Most of the supplies used in the video were found at Walmart or Joann’s.  When painting I look up pictures of the item I want to paint. It is very helpful to use it as a reference so I can stay focused on the topic at hand.

I’m looking forward to sharing more videos like the one above.  Thanks again for watching!

Katie


Caramel Salted Macarons

Caramel Salted Macarons

These macarons are a great treat with a good cup of coffee.  Grab your favorite book, snack and sip and you’ll be smiling all day.  I tried quite a few different caramel salted macaron recipes.  From homemade caramel to this ingenious idea to boil a can of sweetened condensed milk.  I’d have to say this is one of the easier macaron recipes I’ve tried and highly recommend it for your first attempt at macarons.  Make sure it matches your taste buds though; not everyone likes the sweet and salty caramel treat.  I made mine a bit sweeter by adding light brown sugar into the egg whites instead of regular granulated sugar. Bake, share and enjoy!

img_9664

Macaron Filling – Dulce de Leche

Ingredients:

1 can of sweetened condensed milk

Instructions:

  1. Bring a large pot of water to a rolling boil.  Make sure that you put enough water in the pot to completely cover the can.
  2. Remove the label from the can of sweetened condensed milk and carefully submerge it into the boiling water using a pair of tongs.  Make sure you place the can on its side, so it can roll around.
  3. Boil the can for 3 hours, making sure the can is covered with water at all times.  Add more boiled water if needed.
  4. Using a pair of tongs, take the can out of the pot and place it onto a heatproof surface to cool.  Make sure it has cooled to at least room temperature before opening the can, otherwise the dulce de leche will squirt out like a fountain.
  5. Once cooled, place dulce de leche in the refrigerator for an hour and a half (cooled dulce de leche can be stored, tightly covered in the refrigerator for up to 3 weeks) .
  6. When finished cooling, open the can, stir and scoop the cooled filling into a piping bag.  Pipe a small amount onto the macaron shells. Don’t overfill.
  7. Gently place matched shells together.


Macaron Batter

Ingredients:

¾ cup almond flour

1 cup of powdered/confectioners sugar

1 tsp of cream of tartar

2 egg whites

¼ cup light brown sugar

1 tsp coarse sea salt

img_9636

Instructions:

  1. Line parchment paper on two baking sheets.
  2. Have a piping bag prepared with a ½ inch tip and place it in upright in a glass cup.
  3. In a medium bowl, sift almond flour, powdered sugar and cream of tartar. Set aside until step 6
  4. In another medium bowl, beat egg whites at high speed using a wire whisk attachment
  5. When it begins to foam, add in brown sugar and continue to mix until peaks form (2 drops yellow food coloring – optional)
  6. Using a spatula, fold dry ingredients into egg whites.  Do this in TWO batches.
  7. Scoop batter into prepared piping bag.
  8. Pipe batter onto the parchment paper about 1 inch in diameter. Remember to tap the trays so air bubbles surface and macaron shells flatten.
  9. Preheat oven to 300
  10. Sprinkle a pinch of coarse sea salt on top of each macaron. Let the macarons sit for 20 to 30 mins until a “skin” forms.
  11. Bake one pan at a time for 12 to 15 mins. Depending on your oven
  12. Remove the pan from the oven and let the macaron shells cool completely.
  13. Once cooled, begin flipping and matching liked sized macaron shells.  This way they are ready for the filling.

Nila’s blog was extremely helpful!  Make sure to visit her blog for great recipes with good details. the tough cookie


Building Imaginations – Dress Up Furniture

Imagination is so important.  I love giving my children the opportunities to try and/or practice being anything they want to be.  My oldest daughter loves dressing herself.  She rotates between ninja and princess most of the time.  The fun part about making special furniture pieces like this one, is the fact that I can enjoy it right along side my girls.  We have had our fun acting as ballerinas or super heroes flying through the house.  But the best one yet; is when we act like British ladies with adorable hats at a tea party.  That one is my favorite.

img_9562

Don’t worry this didn’t cost an arm and an leg and didn’t take nearly as much time to complete as I thought it would.  Yes we had to sand it, prep it with white primer paint, and then tape it off to do the two tone color effect.  Knowing that this was going to be used by kids, I wasn’t too hard on myself to make it “perfect” (I even let the girls have a go with the painting too).  It will get scratched, dinged and even colored on :/.  Don’t fret, the best part is witnessing it being enjoyed.

You can find all sorts of furniture for inexpensive prices in all sorts of areas.  Mondays and Tuesdays are a great place to start at Goodwill.  I have found many items at garage sales and have even been able to find a couple items in the trash/free pile on front lawns.  This particular piece was found at Lighthouse Ministries (similar to Goodwill but Christian based values) for $25.

img_6454

The primer and light pink paint color I had to purchase from HomeDepot (about $15 – $20), but I already had leftover bright pink paint (always check what you have in your house before spending your money, you’ll be surprised by what you find).

img_6527

Once all the painting was done and dry I made sure to spray paint a sealer over it, twice (You can find spray paint sealer at Walmart for pretty cheap about $5).  Make sure you let it dry in a covered area outside.  It takes a few days for the spray paint smell to disappear.

spray-paint-sealer

My husband had the pleasure of cutting the $9 wooden round dowel and screwing in the two closet pole sockets ($5) to hold the pole in place (make sure it is kid safe – meaning they will try and hang on it, pull it and whatever else they can think of).

img_9566

Last but not least, I had a few leftover cabinet knobs ($5) from another project. These two cute knobs were on clearance at JoAnns.  It just helped pull it altogether.

img_9567-1

In all, this piece cost us around $65.  Well worth it in my eyes, especially since some of the items purchased will be used on other products.  This is also an item I’d like to put in my future tearoom when I have enough room for a children’s tea area.  I look forward to the day when I can watch parents play pretend with their children at my tearoom 🙂


I am NOT receiving compensation for any of the materials suggested here.

Thanks for reading,

Katie

Please feel free to share any re-purposed items you’ve had the pleasure of completing. Also share any special tips or tricks for staying below your spending budget 😉

Sweet Chocolate and Strawberry Cheesecake Macarons

I’m not big on telling some whimsical story before we get to the good stuff – the recipe.  So here is, a tasty sweet treat that can be challenging to make if you don’t use the tips and tricks learned by others.  Enjoy!

Chocolate Macarons with Strawberry Cheesecake Filling

Chocolate Macaron Batter

(Makes about 13 sandwiched macarons)

Ingredients

1 cup powdered sugar

½ cup powdered almonds/almond meal

3 tbsp cocoa powder

2 large egg whites, at room temperature

Pinch of salt

1 tsp Cream of tartar

5 tbsp granulated sugar

Directions

  1. Preheat oven to 350 degrees
  2. Line two baking sheets with parchment paper (to make it easier you may want to use a sharpie on the back of the parchment paper to draw a one inch circle for each macaron shell) and have a pastry bag with a plain tip (about ½ inch) ready.
  3. Sift the powdered sugar, almond powder and cocoa powder (so there are no lumps) into a medium bowl and discard the larger lumps. Add cream of tartar and salt. Set to the side until step 5.
  4. Using a mixer, beat the egg whites (if eggs were not at room temp, place eggs in glass of warm water for 2 mins) until they begin to rise and hold their shape. While whipping, beat in the granulated sugar until very stiff and firm peaks form, about 2 minutes.
  5. Fold the dry ingredients, in two batches, into the beaten egg whites with a rubber spatula.  When the mixture is smooth and there are no streaks of egg white, stop folding and scrape the batter into the pastry bag (standing the bag in a tall glass helps).
  6. Pipe the batter on the parchment-lined baking sheets in 1 inch circles evenly spaced one inch apart (follow the circles that you drew earlier).
  7. Tap the baking sheet/pan a few times firmly on the countertop to flatten the macarons, and to remove the air bubbles.  Allow the macarons to sit for 20 to 30 minutes until a “skin” forms and they are no longer wet when lightly touched.
  8. Bake (one tray at a time) for 10 to 15 minutes.  Once done baking, let macaron shells cool completely.
  9. Once cooled, begin to flip and match like sized macaron shells so they are ready for the strawberry cheesecake filling.


Strawberry Cheesecake Macaron Filling

Ingredients

4 oz of strawberry cream cheese (room temp)

1/2 cup of heavy whipping cream

2 tbsp powdered sugar

½  tsp of vanilla extract (optional)

¼ cup strawberry jam (¼ cup sugar, 5 – 8 strawberries chopped, and 1 tbsp lemon juice)

Directions

  1. Place chopped strawberries in a pot on the stove.  Smash strawberries with a masher and put stove on medium heat.
  2. Add lemon juice, when it starts to simmer add sugar and stir until melted
  3. Remove jam from heat and pour 1/4 cup over the cream cheese in a glass dish. Add a few drops of food coloring.  After it is mixed well, place in the refrigerator until step 5 (save the rest of the strawberry jam for drizzling over the top of the macarons).
  4. In a medium bowl, whip the heavy cream, powdered sugar and vanilla extract until stiff peaks form.
  5. Using a rubber spatula, slowly fold in the strawberry jam cream cheese mixture.  
  6. Place blended filling in the fridge to chill for a few minutes, let cool completely before piping. While you wait for it to cool, have a pastry bag with a plain tip (about 1/2 inch – so pieces of strawberry will fit through the hole) ready.
  7. Pipe a small amount of filling (about a ½ inch mound) on the inside of the macaron shells and then gently sandwich them together.

Macaron Decoration Options:

  1. Dip ⅓ of the macaron into melted chocolate and then dip into crushed almonds.
  2. Drizzle the melted chocolate over macarons and then sprinkle crushed almonds on top and lastly, add a small drop of leftover strawberry jam on the tippy top.

Let macarons stand for one day before serving, to meld the flavors (don’t worry I ate mine immediately and they were delicious).  Serve macarons at room temperature, but store in the refrigerator.

Click on my YouTube video link for the visual recipe instructions:

Sweet Chocolate and Strawberry Cheesecake Macarons


Here are some items you can find on Amazon that were used during the making of this recipe.  I will receive compensation if you click and purchase any of the follow products below:

Pipping Bags Wilton Disposable 16-Inch Decorating Bags, 12 Pack

Icing Tips Wilton 418-1703 Round Star Icing Tip Set, Large

Sifter Cuisinart Set of 3 Fine Mesh Stainless Steel Strainers

Parchment Paper Reynolds Premium Parchment Paper (Non-Stick, 75 Square Foot Roll, 2 count)

Rubber Spatulas Farberware Set of 2 Scraper Spatulas, Red

Handheld Mixer Black And Decker Hand Mixer, MX400B

Cream of TartarMcCormick Cream of Tartar, 1.5 oz

Almond Powder Bob’s Red Mill Super Fine Almond Flour, 16 Ounce Packages (Pack of 4)

Cocoa Powder Nestle Toll House Cocoa, 8 Ounce


This link was very helpful when learning tips and tricks to making macarons – Please check out Beth’s YouTube Video  https://youtu.be/xJ636Y8N6E8